
Doll House for Me – Phase 4
Continued from: Doll House for Me – Phase 3

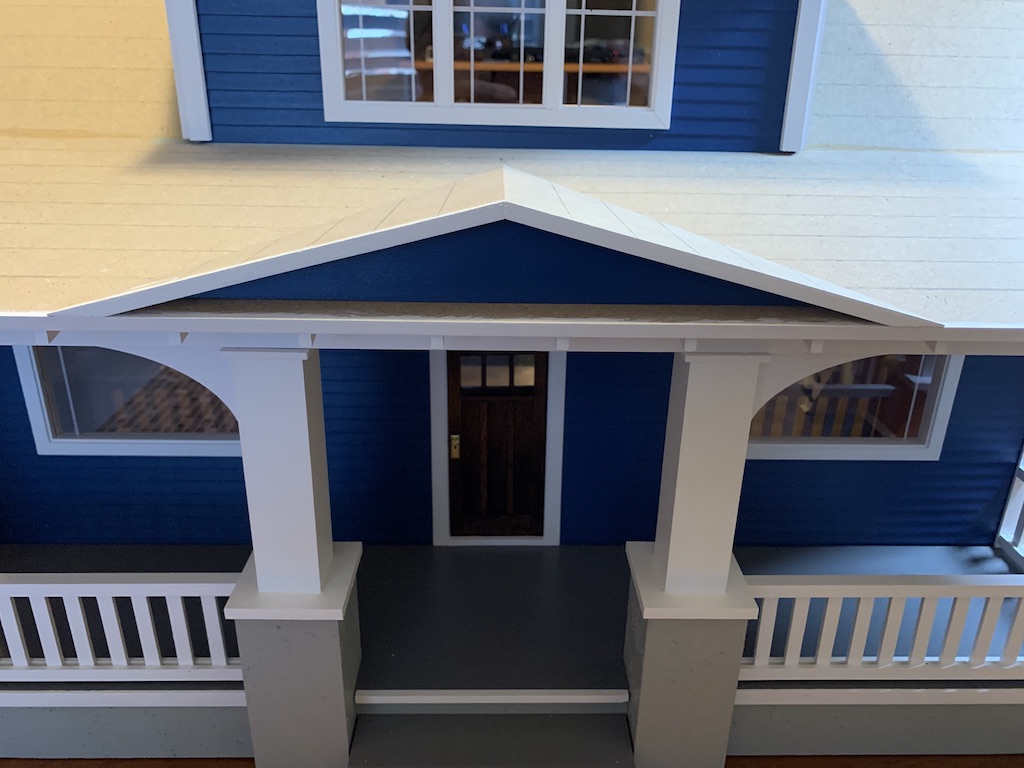
With a proper Craftsman Style door newly installed, I could now continue with the instruction steps to finish the porch, adding the porch post assemblies and the porch beams that would support the porch roof.

But before the roof went on, the instructions indicated that the first and second floor walls should be installed. This was a step I was ready for as I had left unfinished floor slots into which the previously painted walls could be slid. And without the roof in place, it was a much easier task to add the second-floor walls than the challenge I faced on my last doll house with the roof already glued in place.
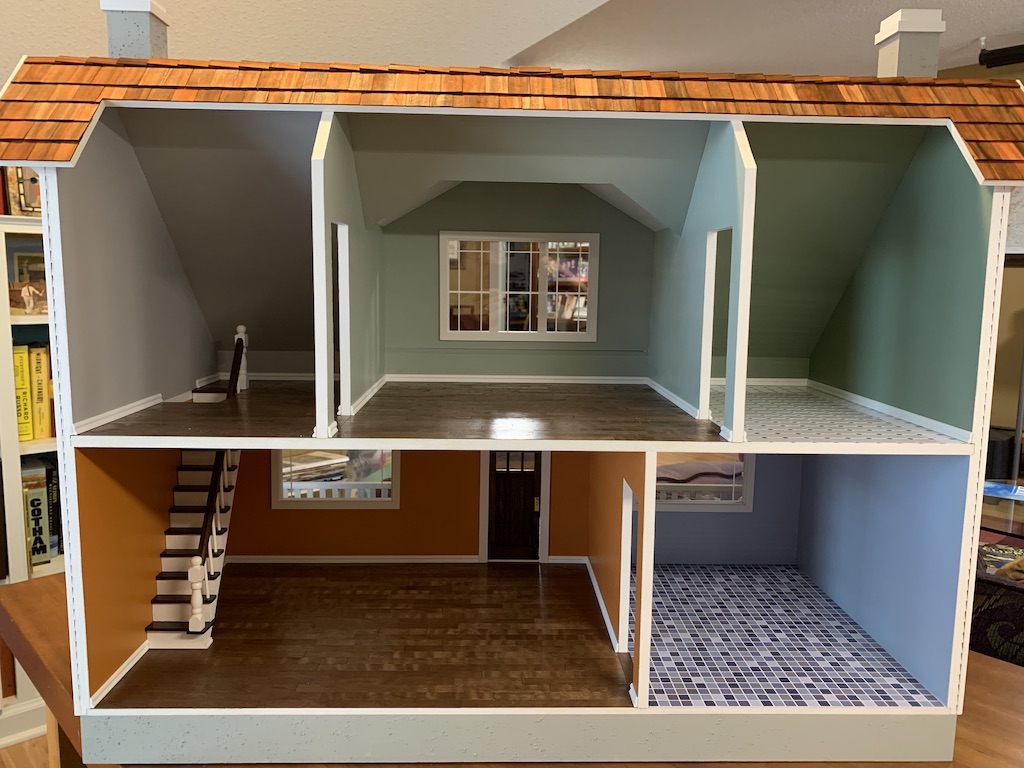
With all the walls installed, I could now add my baseboards and upgraded stairs to the main first-floor room…

…although I decided to hold off adding the baseboards in the kitchen until I had my kitchen cabinetry figured out (since I would want the floor cabinets flush against the wall).

Adding baseboards to the three second-floor rooms was a breeze with no roof in place.
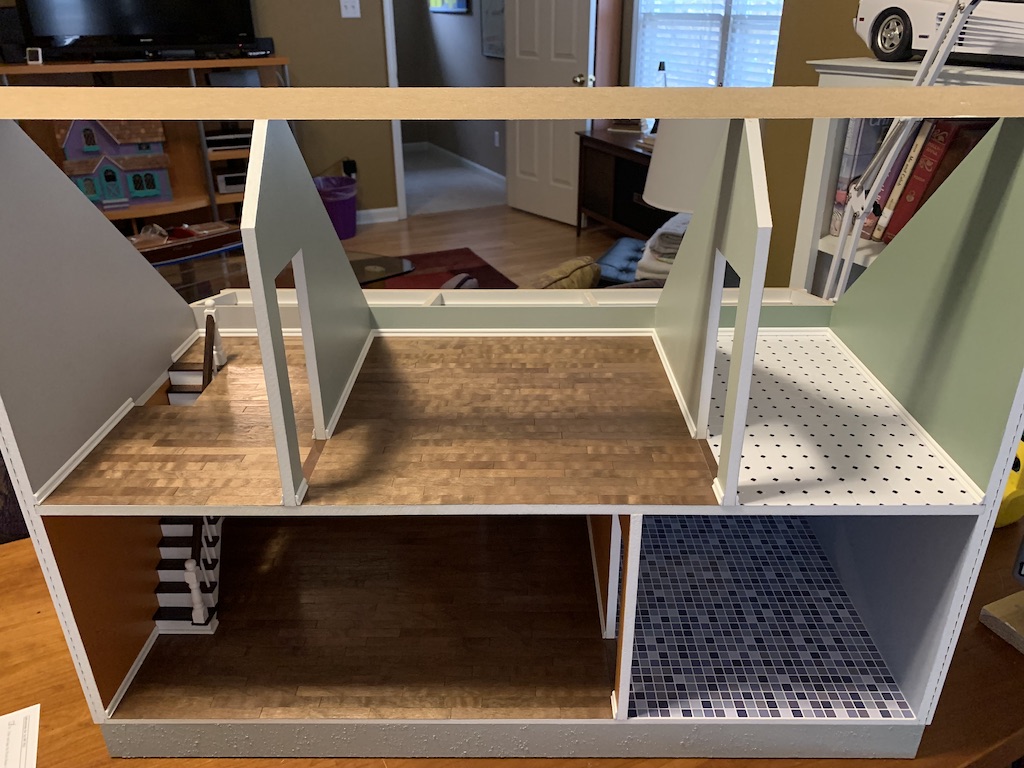
With the walls up and the baseboards installed, I could now add the roof along with the final porch trim…

…followed by attaching the dormer which was the last step to finish off the second-floor interior.

Once I installed the eave brackets (I just love this feature) …

…I was ready to tackle the eave rafters and eave trim strips.
You may recall from the last doll house I built that the indicated angles of cut for these side pieces left undesirable gaps.

To avoid this problem, I decided to use leftover scraps to cut the designated angles and see how they fit before committing to cutting the actual painted parts. Some worked great as these two 45° angles were just right.

But others did not.
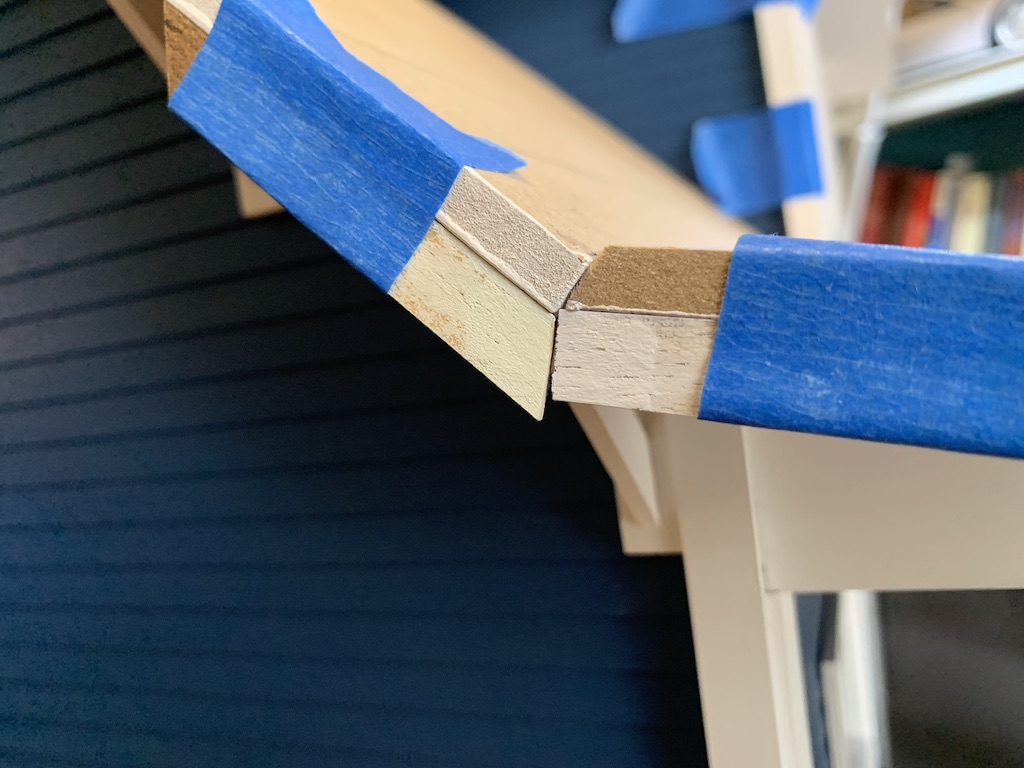
Not only was there a gap at the joint of the two trim pieces, but because I was joining a 30° angle with a 90° angle, the two cuts as a result were not the same length (recall the hypotenuse of a right triangle is always longer than either side, in this case, the length of the 30° angle cut (the hypotenuse) is longer than the 90° angle cut). In non-geometrical terms, the width of the trim pieces was 3/8 of an inch, so the length of a square cut was also 3/8 of an inch, but the length of the angled cut was nearly an 1/8 of an inch longer.
I used my handy protractor to measure the actual angle formed by the two roofs and found it was very close to 30°, so I decided to try to cut each of my scrap pieces at a 15° angle thus making the cuts exactly the same length and summing up to the needed 30° angle.

I was very pleased with the result and now just had to figure out how long the whole rafter pieces needed to be. Experientially, I determined the correct lengths for all three rafter strips and using the correct angle scraps as a template for my cuts, I was able to get the rafters to a near perfect finish. I am so glad that I used this additional approach with the scrap strips for as the saying goes, “practice makes perfect.”

Following this same approach, I cut and glued on the rafter strips for the other side and for the front dormer. And with this success under my belt, I felt confident using this new tactic for the eave edge trim pieces, which would use the same cut angles, but different lengths. The approach worked again.
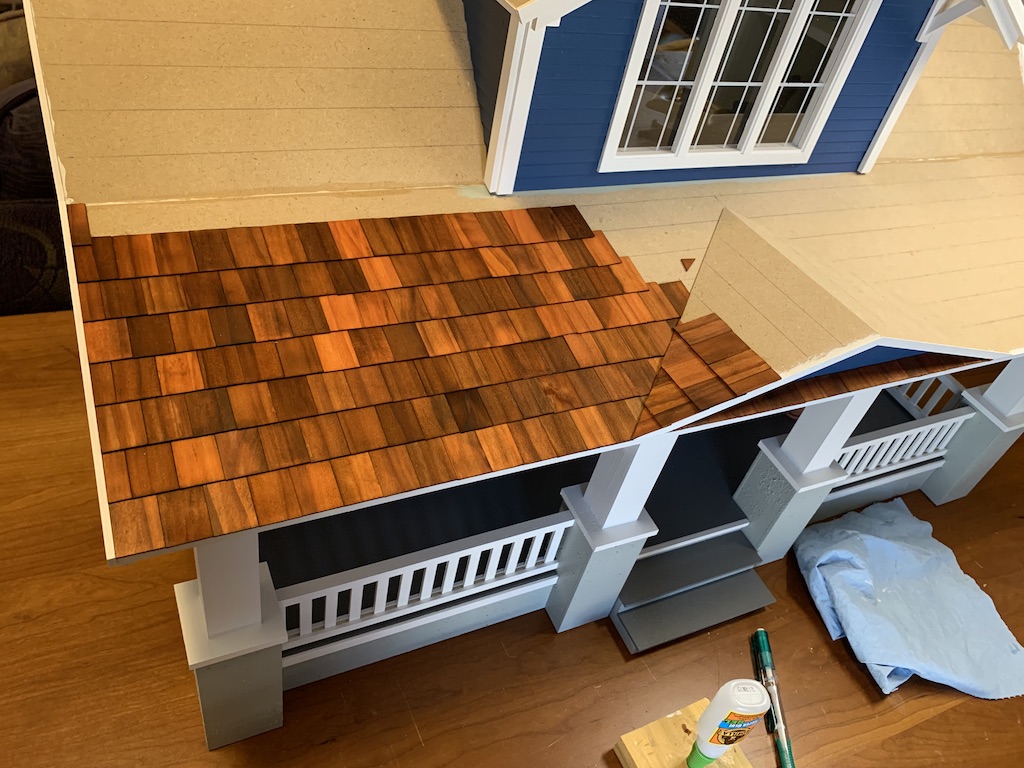
With these eave pieces in place, I was only two steps away from being ready for the final process—shingling. Normally, I would have already had the shingles dyed and ready to install as the dying process takes about a week. But I really wanted to get the dormer and trim in place first so I could compare how the two different colored shingle options looked with the blue painted exterior.
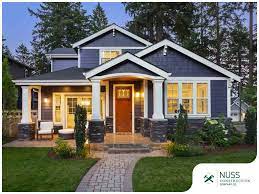
You may recall I found this house online and used it as inspiration for the exterior paint choice. The roof has a grey colored shingle which is one of the two options I have since I used these on the first two doll houses I built at the beginning of the pandemic. But after using the reddish-brown colored shingles on the two Victoria’s Farmhouses and the Beach Bungalow that I built, I really preferred this color.

I had left over shingles of both colors and so laid out a small test area and sent the above photo to my sister the artist asking her opinion. As usual, she offered me sage advice (pun intended). She said the grey would blend with the blue and the rust would contrast. She went onto say that both would work, the grey being more subtle and the reddish-brown being more dramatic.

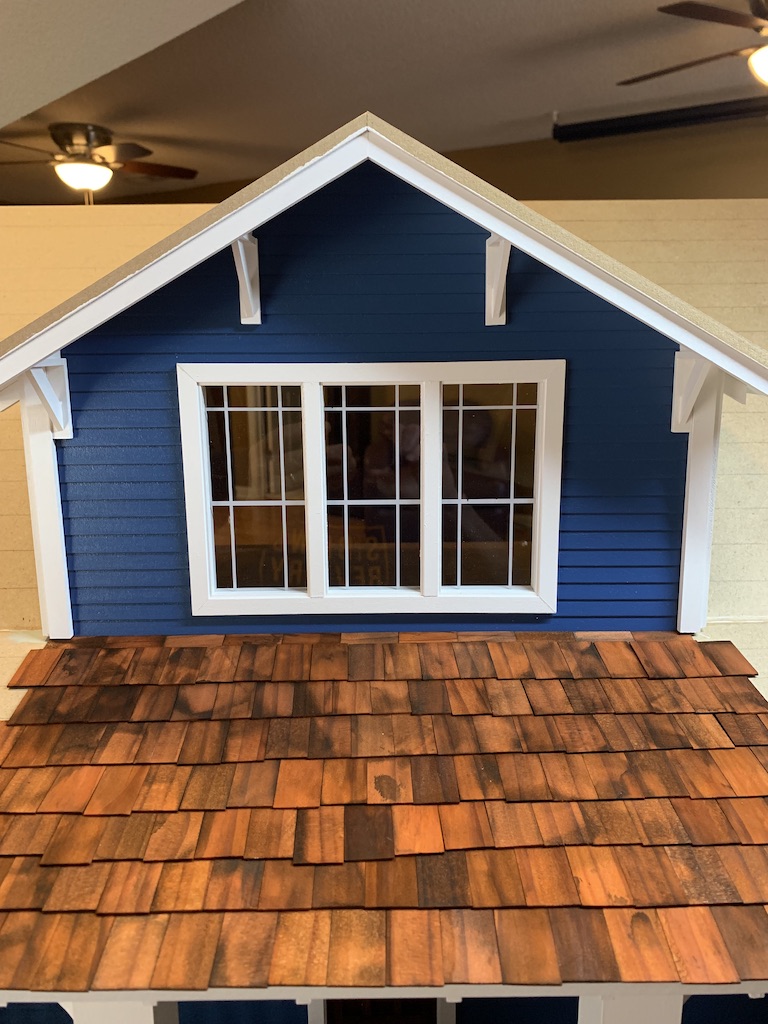
Making a larger area mockup convinced me to go with the dramatic reddish-brown shingles.
With the shingle color selected, the last two steps were to first glue in place the cricket roof, …
… a triangular shaped roof used to divert rainwater away from the porch steps (of course this baby won’t be out in the rain) and then to add the two chimneys.

I have covered the shingling process in previous doll house posts so other than the additional challenge of shingling around the cricket roof where every shingle was a different cut…
… I will spare you the roofing details and jump to the finished house.
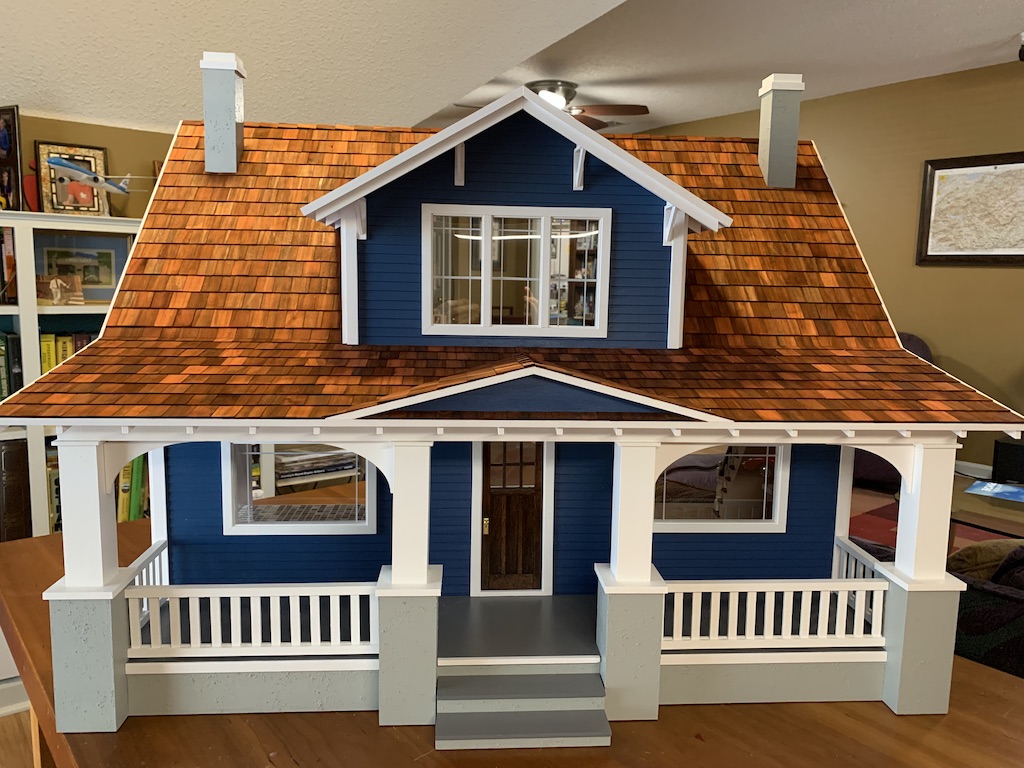

 I must say I am most pleased with the outcome!
Now I just need to figure out the kitchen cabinets, kitchen appliances, and bathroom fixtures to make the house move-in ready. Then I’ll need to figure out all the furnishing which I will post about in the future. But first, I’m going to relax from all my hard work—or rather play—by allowing my 1/12-scale self to sit in this mid-century modern Eames Lounge Chair and enjoy a miniature adult beverage.

Cheers!
Categories

I
David, this house is absolutely beautiful! As I was reading it, I wanted to shrink myself and live in it – or at least visit it for awhile. Just like you did at the conclusion! I’ve had an ongoing dilemma about my own dollhouse – regarding the bathroom. I had removed it from its original location in order to open up the view. After looking at this floor plan, I’m thinking I am just going to sacrifice the 2nd bedroom/study and turn it into a bathroom. I originally had the idea to move it to the attic, but the scale wasn’t right. And so I didn’t move forward. Your work on this house is stunning – beautifully exact. It’s so funny how we strive to get details just right (or as close as I can.) For example, the roofing for a miniature doll house that won’t be out in the rain. What is it about miniatures that capture our imagination? I look forward to your future posts about the kitchen and the furnishings.
Thanks, Betty! As always, I really appreciate your praise and kind words. And I am even more pleased if I have given you some ideas for your own dollhouse. I just love miniatures and I am so glad we have connected through our blogs to share this passion.
David, I would LOVE to retire to that house! Wouldn’t it be fantastic in Montreat? Great job with the house details and the post. Your challenge with the roof angles reminded me I have a simple tool, bought long ago (when I did some woodworking myself) that helps get the angles right. I can give it to you, if interested! Wish I were small enough to join you and enjoy that beer you had in the final photo. Cheers!
Thanks, Bro and you’re right, it would be perfect in Montreat! I would definitely be interested in seeing the tool you have. Cheers!